3.0 Stepping Up Security: Foundation: Mastering Workload Identity Security in Microsoft Entra ID - An Exploratory Guide
Blog 3: Stepping Up Security - Introduction to Workload Identities Premium & Conditional Access

In the first two blogs of this series, we established a foundational understanding of workload identities, how to discover them, and essential hygiene practices using the free tier of Microsoft Entra ID. Now, we're ready to explore the enhanced security capabilities of Microsoft Entra Workload Identities Premium. This blog will introduce the premium features and dive deeply into configuring conditional access specifically for your service principals.
Introducing Microsoft Entra Workload Identities Premium
Microsoft Entra Workload Identities Premium is a separate license (currently around £2.30 or $3 per workload identity per month, but always check a Microsoft licensing specialist for the latest pricing in your region) unlocks advanced security and governance features designed to protect your non-human identities. Unlike user-based licences, you don't assign Workload Identity Premium licences to individual service principals. Instead, having the appropriate number of licences in your tenant (typically at least one to enable the features, with the expectation you license all workload identities you wish to protect with these premium capabilities) enables these features tenant-wide for eligible workload identities.
Key Premium Features include:
Conditional Access for Workload Identities: Apply granular access controls to your service principals based on conditions like location or risk. (This blog's focus)
Identity Protection for Workload Identities: Detect and respond to risky sign-ins and compromised credentials for your service principals. (Covered in Blog 4)
Access Reviews for Workload Identities: Conduct reviews of service principals' access, especially those assigned to privileged roles. (Covered in Blog 5)
App Health Recommendations: Receive recommendations to improve the security posture of your applications and service principals (e.g., removing unused credentials – some of these recommendations may also surface without premium, but deeper insights and management capabilities are enhanced).
Why Conditional Access for Workload Identities?
Just as Conditional Access is a cornerstone for user security, extending it to workload identities provides a powerful way to enforce organisational security policies on how your applications and services access resources. Service principal accounts, if compromised, can provide attackers with significant access. Conditional Access helps mitigate this by allowing you to:
Block access from untrusted locations: Prevent service principals from authenticating from unexpected or known malicious IP ranges.
Block access based on risk: Integrate with Identity Protection to block service principals deemed risky (e.g., due to leaked credentials).
Enforce specific controls: Although limited primarily to "Block" access, the framework allows for future enhancements.
Scope of Conditional Access for Workload Identities:
This applies to single-tenant service principals registered with your tenant.
Does NOT apply to:
Managed Identities for Azure resources.
Multi-tenant service principals (applications homed to other tenants you've consented to).
Microsoft's default service principals.
Deep Dive: Configuring Conditional Access for Service Principals
Let's create a location-based Conditional Access policy to restrict where a specific service principal can authenticate.
Prerequisites:
Microsoft Entra Workload Identities Premium license is active in your tenant (see Supporting Blog A).
Administrative roles: Conditional Access Administrator or Security Administrator.
Named Locations configured (if blocking/allowing specific IPs/countries). To configure Named Locations:
Navigate to Protection > Conditional Access > Named Microsoft Entra admin centre locations.
Define IP ranges or countries. For example, create a "Trusted Corporate IPs" location.
Step-by-Step: Creating a Location-Based Conditional Access Policy
Imagine you have a critical internal application (represented by a service principal) that should only ever authenticate from your corporate network IP ranges.
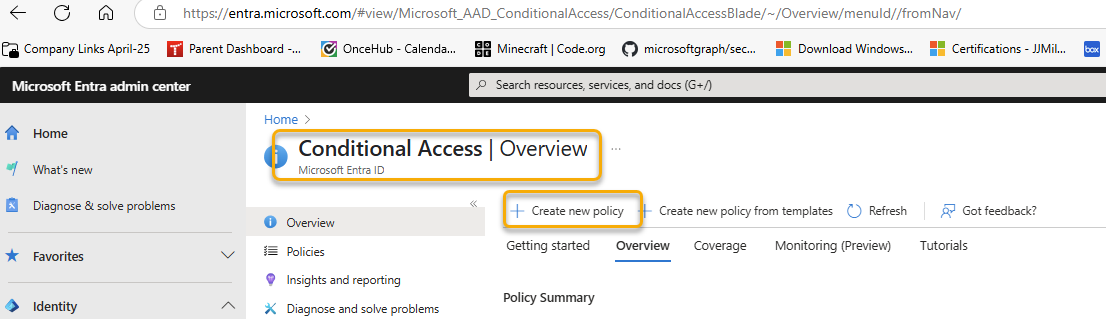
Navigate to Conditional Access Policies:
In the Microsoft Entra admin centre (https://entra.microsoft.com), go to Protection > Conditional Access.
Select Policies from the sidebar, then click + New policy.
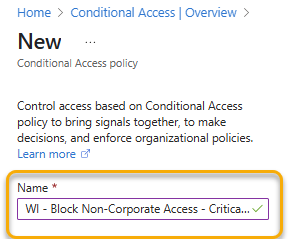
Name Your Policy:
Give your policy a descriptive name, e.g., "WI - Block Non-Corporate Access - CriticalAppSP".
Assignments - Target Workload Identities:
Under Assignments, click on Users or workload identities.
Select the radio button for Workload identities.
(This option will only be fully configurable if Workload Identities Premium is active).
Under What does this policy apply to?, from the dropdown, ensure Workload identities is selected.
In the Include tab:
Choose Select service principals.
Search for and select the specific service principal(s) you want this policy to apply to (e.g., the service principal for your "CriticalAppSP").
Click Select.
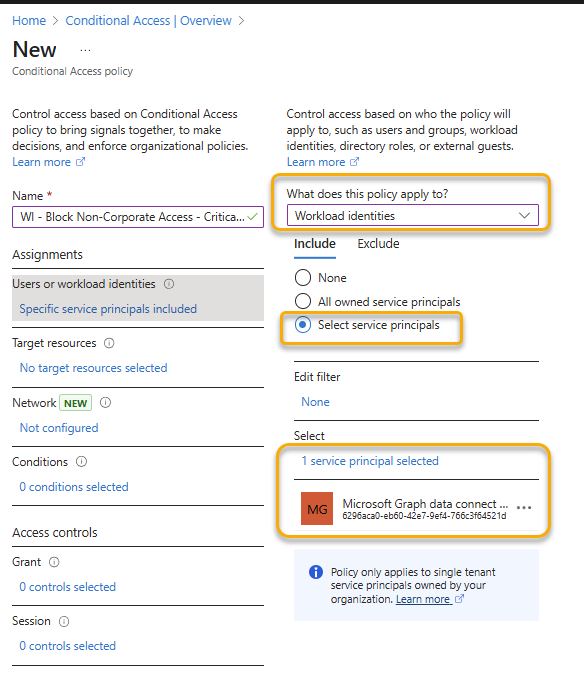
Exclude (Optional): You can exclude specific service principals if needed, but direct inclusion is usually clearer for a targeted policy like this.

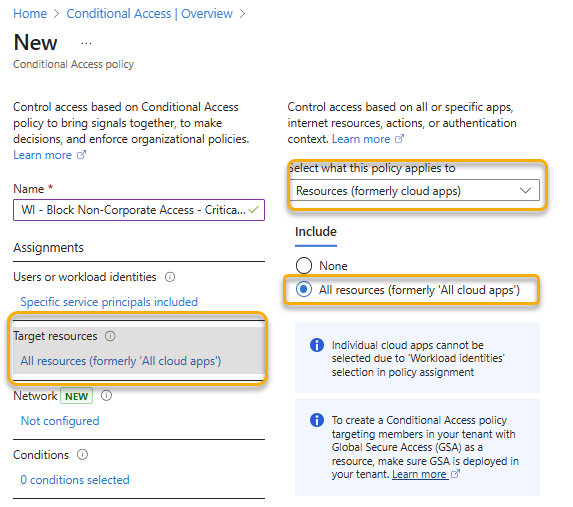
Target Resources:
Under Target resources (previously Cloud apps or actions):
Keep the default All cloud apps selected for the include section.
Important: Conditional Access policies for workload identities evaluate when the service principal requests a token. Selecting "All cloud apps" ensures the policy applies broadly whenever the targeted service principal attempts to authenticate.
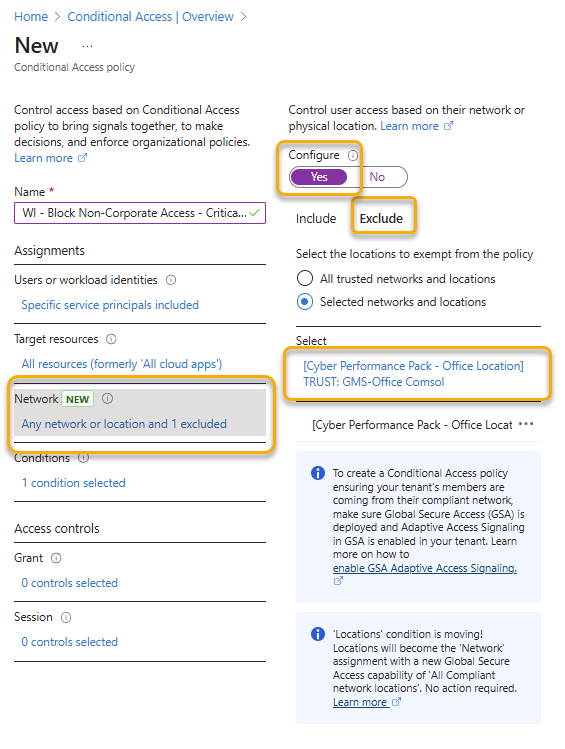
Conditions - Location:
Under Conditions, click on Locations.
Set Configure to Yes.
Under Include, select Any location.
Under Exclude, select Selected locations.
Tick the box next to your pre-configured Named Location (e.g., "Trusted Corporate IPs").
Click Done.

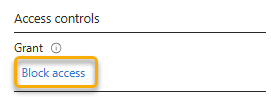
Access Controls - Grant:
Under Access controls, click on Grant.
Select Block access.
Currently, "Block access" is the primary control for workload identity Conditional Access policies.
Click Select.

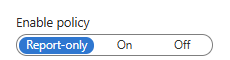
Enable Policy:
At the bottom, under Enable policy:
Report-only: Start with this mode. It allows you to evaluate the policy's impact without enforcing it. Monitor sign-in logs (ServicePrincipalSignInLogs in Entra ID Monitoring or Log Analytics) to see where the policy would have applied.
On: Once you're confident, switch to "On" to enforce the policy.
Off: Disables the policy.
Click Create.

Monitoring and Verification:
Service Principal Sign-in Logs: After enabling the policy (even in report-only mode), monitor the ServicePrincipalSignInLogs.
In the Entra admin centre: Identity > Monitoring & health > Sign-in logs > Service principal sign-ins tab.
Select a log entry, go to the Conditional Access tab, and it will show which policies applied (or would have applied in report-only mode) and the result.
Using PowerShell to List CA Policies Targeting Workload Identities (Beta Cmdlets):
While CA policy creation is primarily a UI-driven process, you can list policies. You'll need the Policy.Read.All permission.
# Ensure you are connected to MgGraph: Connect-MgGraph -Scopes "Policy.Read.All"

# Get all Conditional Access Policies using the beta cmdlet
$caPolicies = Get-MgBetaIdentityConditionalAccessPolicy -All

# Initialize array to store policies targeting workload identities
$workloadCaPolicies = @()

foreach ($policy in $caPolicies) {
    $targetsWorkloadIdentities = $false

    # Check newer assignment structure
    if ($policy.Assignments.UsersOrWorkloadIdentities) {
        if ($policy.Assignments.UsersOrWorkloadIdentities.IncludeServicePrincipals.Count -gt 0 -or
            $policy.Assignments.UsersOrWorkloadIdentities.ExcludeServicePrincipals.Count -gt 0) {
            $targetsWorkloadIdentities = $true
        }
    }

    # Check legacy Users assignment
    if ($policy.Assignments.Users) {
        if ($policy.Assignments.Users.Include.Count -gt 0 -or
            $policy.Assignments.Users.Exclude.Count -gt 0) {
            $targetsWorkloadIdentities = $true
        }
    }

    # Check ClientApplications condition block
    if ($policy.Conditions.ClientApplications) {
        if ($policy.Conditions.ClientApplications.IncludeServicePrincipals.Count -gt 0 -or
            $policy.Conditions.ClientApplications.ExcludeServicePrincipals.Count -gt 0) {
            $targetsWorkloadIdentities = $true
        }
    }

    if ($targetsWorkloadIdentities) {
        $workloadCaPolicies += $policy
    }
}

if ($workloadCaPolicies.Count -gt 0) {
    Write-Host "Found $($workloadCaPolicies.Count) CA policies targeting workload identities (via any structure):"
    $workloadCaPolicies | Select-Object DisplayName, Id, State | Format-Table
} else {
    Write-Host "No CA policies found targeting workload identities via any known structure."
}
Best Practices for Conditional Access for Workload Identities:
Start with Report-Only: Always.
Least Privilege: Apply policies to only the specific service principals that require them. Avoid overly broad policies.
Test Thoroughly: Ensure legitimate access is not blocked.
Named Locations: Keep your Named Locations accurate and up to date.
Documentation: Document your policies, their purpose, and the service principals they affect.
Alerting: Configure alerts for critical policy blocks (e.g., via Log Analytics alerts on ServicePrincipalSignInLogs where CA resulted in a block).
Next Steps
Conditional Access based on location is a strong first step. In Blog 4, we'll explore another powerful premium feature: Identity Protection for Workload Identities, and how to use its risk detections as a condition in your CA policies for even more dynamic and responsive security.